
If you have a surround sound system in your home, then you know how important it is to have the speakers properly wired to the receiver. If not done correctly, you will not get the full effect of the surround sound and may even damage your equipment. Here is a simple guide on how to wire speakers to receiver.
How to Connect Speakers to Amplifiers | Home Audio Basics
- Unscrew the backs of the speakers and remove the wires
- Cut two lengths of speaker wire for each speaker, making sure they are long enough to reach from the speaker to the receiver
- Strip 1/2 inch of insulation off each end of each wire using a wire stripper or a sharp knife
- Twist the bare copper ends of each wire around the appropriate terminal on the back of the speaker (the positive terminal is usually marked with a “+” sign)
- Screw the terminals back onto the speakers, being careful not to overtighten them and damage the wires
- Plug one end of each length of speaker wire into an open input on your receiver (again, matching positive to positive and negative to negative)
- If your receiver has A and B inputs, you can use these to connect additional pairs of speakers in other rooms (just make sure not to overload your receiver by connecting too many speakers at once)
How to Connect Extra Speakers to Stereo
If you want to add extra speakers to your stereo system, there are a few things you need to know. First, you’ll need to determine if your receiver is able to power additional speakers. If so, you’ll need to identify how many watts per channel it can handle.
You’ll also need to make sure that the impedance of the extra speakers is compatible with your receiver. Finally, you’ll need speaker wire to connect everything together.
If your receiver is powerful enough and has the correct impedance rating, then adding extra speakers is a fairly straightforward process.
Simply run speaker wire from the appropriate output on the receiver (labeled “speakers” or something similar) to each of the new speakers. Make sure that the wire is long enough to reach each speaker without stretching too much, as this could damage the insulation and affect sound quality. Once everything is connected, turn on your stereo and enjoy!
How to Hook Up Speakers to Sony Receiver
If you’re looking to add some great sound to your Sony receiver, then hooking up some speakers is a great way to do it. But before you can enjoy the fruits of your labor, there’s a little bit of work that needs to be done first. Here’s a quick guide on how to hook up speakers to Sony receiver.
The first thing you’ll need to do is identify where your speaker terminals are located on your Sony receiver. Once you’ve found them, take a look at the back of your speakers and find the corresponding terminals. If everything matches up, then it’s time to start making the connections.
Start by connecting the positive (red) wire from your speaker to the positive terminal on your Sony receiver. Then do the same with the negative (black) wire. Make sure that everything is snug and secure so that there’s no chance of anything coming loose or falling out.
Now it’s time to power on your Sony receiver and test things out. Crank up the volume and see how things sound – if everything sounds good, then you’re all set! If not, then go back and double-check all of your connections to make sure that they’re tight and secure.
And that’s all there is to it! Hooking up speakers to Sony receiver is a pretty simple process, so long as you take care in making all of your connections properly. With just a little bit of effort, you can greatly improve the sound quality emanating from your home theater system.
How to Connect Speaker Wire to Amp
If you’re looking to add some serious sound to your home theater or music setup, then you’ll need to connect your speakers to an amplifier. This can seem like a daunting task for those who are unfamiliar with audio equipment, but it’s actually quite simple once you know what you’re doing. Here’s a quick guide on how to connect speaker wire to amp.
First, you’ll need to gather your materials. You’ll need speaker wire (of course), banana plugs or binding posts (to connect the wire to the amp), and an amplifier. Once you have everything, the first step is connecting the wires to the binding posts on the back of the amp.
If your amplifier has banana plugs, then simply insert the stripped end of the speaker wire into the plug and tighten until secure. If your amp uses binding posts, then use either bare wire or spade terminals to attach the wire.
Next, run the speaker wire from the back of the amplifier to wherever your speakers are located.
If they’re in different rooms, then you may need to purchase some extra length of speaker wire. Once the wire is in place, all that’s left is connecting it to your speakers using either banana plugs or binding posts (again). And that’s it!
Just make sure that all connections are tight and secure so that there isn’t any chance of loose wires causing problems down the road.
How to Hook Up Speakers to a Kenwood Receiver
Most people know how to hook up speakers to an amplifier or receiver. However, many do not know how to properly connect their Kenwood receiver. Here are some tips on how to do so:
1. Make sure that the power is off before you start connecting anything.
2. Use speaker wire to connect the positive terminal of the left speaker to the positive terminal of the receiver. Do the same for the right speaker.
3. Connect the negative terminals of both speakers to each other.
4. Finally, plug in the power cord and turn on your receiver.
Connecting Multiple Speakers to an Amplifier
Do you have more than one speaker and want to connect them to an amplifier? It’s actually quite easy to do. All you need is some basic knowledge of electronics and a few simple tools.
The first thing you need to do is determine which type of amplifier you have. There are two main types: tube amplifiers and solid state amplifiers. Tube amplifiers use vacuum tubes to amplify the signal, while solid state amplifiers use transistors.
Each type has its own advantages and disadvantages, so it’s important to choose the right one for your needs.
Once you’ve determined which type of amplifier you have, the next step is to gather your materials. For this project, you’ll need speaker wire, banana plugs (if your speakers don’t have binding posts), and an RCA cable (if your amplifier doesn’t have a built-in phono preamp).
You’ll also need a screwdriver and a pair of pliers.
Now that you have all of your materials, it’s time to start connecting everything together. Begin by running your speaker wire from the amplifier to the first speaker.
Make sure that the positive (red) lead goes to the positive terminal on the speaker, and the negative (black) lead goes to the negative terminal. Once both leads are connected, screw or clip them in place so they can’t accidentally come loose. Repeat this process for each additional speaker until all are connected.
If your speakers have binding posts, simply insert the banana plugs into each one and tighten them down with the included screws or clips. If your speakers don’t have binding posts, just strip about 1/2″ of insulation off of each end of the speaker wire and twist each bare wire around one of the terminals on the back of the speaker until it’s snugly tight. Again, make sure thatthe positive lead goes tothe positive terminalandthe negativelead goesto thenegativeterminal .
Finally, if your amplifier doesn’thavea built-in phono preamp ,you’llneedto connect anRCAcable betweenthe “phonoi n” jackonthe backofyouramplifierandthe “line out”jackonyour turntableor otheraudio source . Again , makethepositiveleadgoestothepositive jackandthennegativeleadgoestothen egative jack .
Andthat’sit!
Credit: www.crutchfield.com
How Do I Hook Up Speakers to My Receiver?
There are a few things you need to know in order to hook up speakers to your receiver. First, you need to make sure that your receiver is compatible with the speakers you have. Second, you need to determine what kind of speaker wire you will need.
Finally, you need to connect the speakers to the receiver using the proper speaker wire.
Before you purchase any new receivers or speakers, it is important that you ensure that they are compatible with each other. The last thing you want is to get home and find out that your new receiver doesn’t work with your old speakers or vice versa.
Once you have confirmed compatibility, it is time to start thinking about speaker wire.
Most receivers come with color-coded ports for different types of audio input/output. The colors will typically be red and white for left and right stereo sound respectively.
There may also be a black port for a subwoofer output if your receiver is equipped with one. In terms of speaker wire, there are two main types: shielded and unshielded. Shielded cable is wrapped in an extra layer of metal foil which helps protect against interference from things like electrical appliances or power lines nearby.
Unshielded cable does not have this protection so it is more susceptible to interference but it is also less expensive.
Now that you know what kind of speaker wire you need, it’s time to connect the cables between the speakers and receiver. Begin by connecting the positive (red) wires from each speaker into their corresponding positive port on the back of the receiver marked with a + sign next to it .
Next, do the same thing with negative (black) wires into their respective negative (-) ports on the receiver . If everything was done correctly , when turn on your system should now work as intended !
Can You Connect Any Speakers to a Receiver?
Yes, you can connect any speakers to a receiver as long as the speaker has an appropriate input for the receiver. For example, if the receiver only has a stereo RCA input, then you would need to connect speakers that have a stereo RCA input. If the receiver only has a mono 1/4″ input, then you would need to connect speakers that have a mono 1/4″ input.
How Do I Connect Speaker Wire?
If you’re looking to connect speaker wire, there are a few things you’ll need to keep in mind. First, you’ll need to determine what gauge wire you’ll need. The thicker the wire, the more current it can carry and the better it will be for long runs.
For most applications, 16 or 14 gauge wire will suffice.
Next, you’ll need to decide on a connector type. The two most common types are banana plugs and spade terminals.
Banana plugs offer a convenient way to connect and disconnect speakers without having to strip and twist wires each time. Spade terminals provide a more secure connection that is less likely to come loose over time.
Once you have your connectors and wire gauge selected, simply strip the insulation off of the ends of your speaker wires using a wire stripper tool.
Then insert the bare wires into your chosen connectors and tighten them down securely. That’s all there is to it!
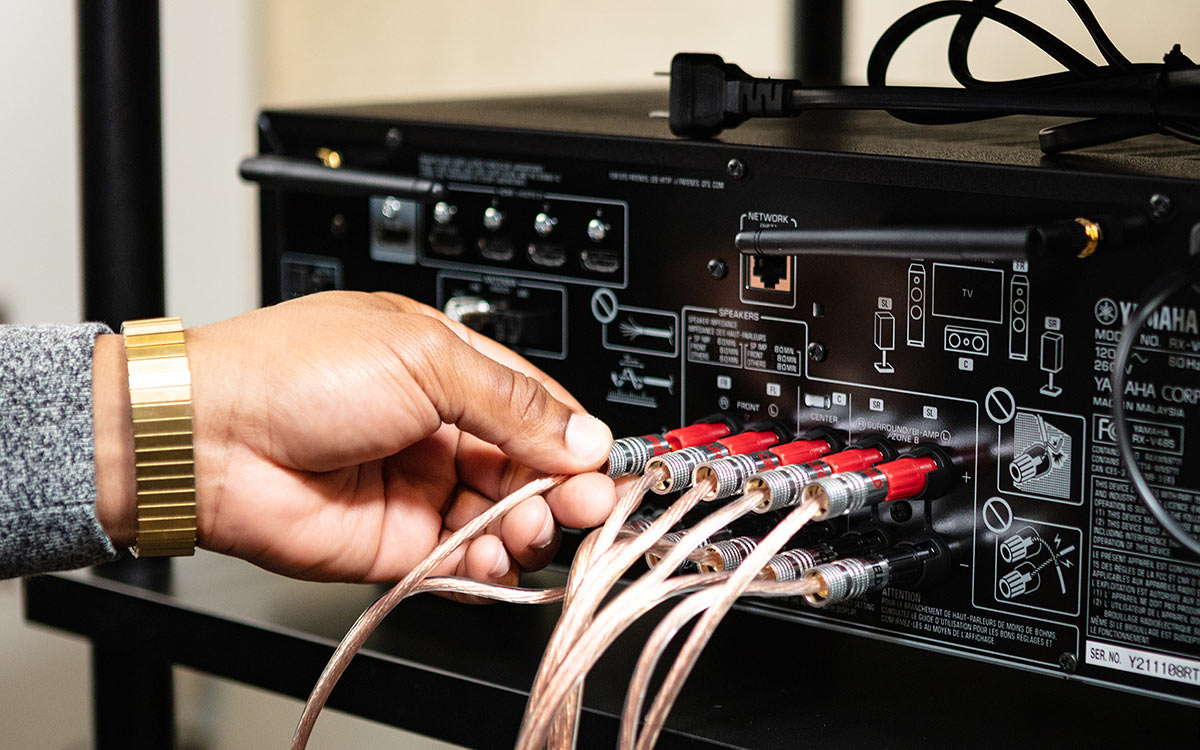
How Do You Connect Speaker Wire to the Back of a Receiver?
In order to connect speaker wire to the back of a receiver, you will need to use a speaker wire connector. There are two types of speaker wire connectors: binding posts and spring clips. Binding posts have four terminals (positive and negative for both left and right speakers) and can accommodate banana plugs, spade lugs, or bare wire.
Spring clips have two terminals (positive and negative for either the left or right speaker) and can only accommodate bare wire.
If your receiver has binding posts, then connect the positive terminal of your left speaker wire to the positive binding post of your receiver labeled “left” or “L,” and connect the negative terminal of your left speaker wire to the negative binding post of your receiver labeled “left” or “L.” Do the same for your right speaker wires at the binding posts labeled “right” or “R.”
If your receiver has spring clips, then first twist together the positive leads of both your left and right speaker wires so that they are securely connected. Then twist on a small piece of black electrical tape around this connection so that it is covered. This will ensure that there is no chance of the connection coming undone.
Next, take this single lead and insert it into the spring clip terminal marked with a “+” sign; make sure that it is inserted as far as it will go into the terminal.
Conclusion
If you’re looking to improve your home audio system, one of the best ways to do it is by wiring your speakers to a receiver. This will give you much better sound quality than using Bluetooth or other wireless connections. Plus, it’s not as difficult as you might think!
Here’s a step-by-step guide to wiring speakers to a receiver.
1. Start by disconnecting your speakers from any power source. If they’re plugged into an outlet, unplug them now.
2. Next, take a look at the back of your receiver. You’ll see a bunch of different inputs and outputs, but for our purposes, we’re interested in the “speaker output” terminals. These are usually color-coded, so it should be easy to identify them.
3. Take some speaker wire and strip about half an inch of insulation off each end. Once that’s done, twist each wire around its corresponding terminal on the back of the receiver (left goes to left, right goes to right). Make sure these connections are tight; loose wires can cause all sorts of problems with sound quality.
4. With the wires connected at the receiver end, now it’s time to run them over to your speakers themselves. Again, pay attention to which side is left and which is right; this will ensure that your stereo imaging is correct when everything’s up and running again..
Most speakers have binding posts or spring clips that make connecting wire pretty straightforward; just insert the stripped end of the wire into the hole or clip and tighten down firmly until you feel resistance.. In some cases, you may need spade terminals or banana plugs for proper connection; if so follow those instructions instead.
. 5 Lastly double check all your connections are secure then plug everything back in and turn on your receiver.. You should now have great sounding wired speakers!.