
Hooking up speakers to a receiver is easy and only takes a few minutes. All you need is an audio input on the receiver and speaker wire. First, connect the positive (red) speaker wire to the positive terminal on the receiver.
Next, connect the negative (black) speaker wire to the negative terminal on the receiver. Finally, plug in the power cord to the outlet and turn on your receiver. You should now have sound coming from your speakers!
- Find a place for the receiver
- It should be in a central location so that all of the speaker wires can reach it
- Connect the power cord to the receiver and plug it into an outlet
- Connect each of the speakers to the receiver using speaker wire
- Make sure to match up the positive and negative terminals on both the receiver and speaker
- Turn on the receiver and adjust the volume to your desired level
How to Hook Up Speakers to Sony Receiver
If you’re looking to improve your home audio setup, then connecting speakers to a Sony receiver is a great way to do it. Here’s how to do it:
1. Start by connecting the positive (+) terminal of your first speaker to the positive (+) terminal of your receiver.
2. Then, connect the negative (-) terminal of your first speaker to the negative (-) terminal of your second speaker.
3. Finally, connect the positive (+) terminal of your second speaker to the negative (-) terminal of your receiver.
That’s all there is to it!
Once you’ve done this, you’ll be able to enjoy improved sound quality from your Sony receiver.
How to Hook Up Speakers to a Kenwood Receiver
If you want to enjoy music to its fullest potential, you need a great receiver. And if you want a great receiver, you need the Kenwood. This guide will show you how to hook up speakers to a Kenwood receiver so that you can get the most out of your listening experience.
First, identify where you want to place your speakers in the room. Once you have their locations marked, it’s time to start connecting them to the receiver. Each speaker will need two wires: a positive and a negative.
The colors don’t matter, as long as they are consistent for each speaker. So if one speaker has red and black wires, all the other speakers should have red and black wires too.
Attach the positive wire (red or black) of each speaker to the corresponding positive terminal on the back of the Kenwood receiver using banana plugs or bare wire.
Do the same for the negative terminals (white or green). If using banana plugs, make sure they are fully inserted into both the speaker and receiver terminals before moving on – a tight fit is key!
Now that your speakers are connected, turn on your Kenwood receiver and adjust the volume levels until they sound just right.
Remember, too much bass can cause distortion so start with lower levels and work your way up gradually until you find that perfect balance. Enjoy!
How to Connect New Speakers to Old Receiver
If you’re looking to upgrade your home audio setup, you may be wondering how to connect new speakers to your old receiver. While receivers are not as common as they once were, many people still have them and they can be paired with any number of different types of speakers. In this blog post, we’ll go over how to connect new speakers to an old receiver, what cables you’ll need, and a few things to keep in mind during the process.
The first thing you’ll need to do is determine what type of connection your receiver has. The most common types are RCA and speaker wire connections. If your receiver has RCA connections, you’ll need an RCA-to-speaker wire adapter (these can be found at most electronics stores).
If your receiver has speaker wire connections, you’ll just need some speaker wire (this can also be found at most electronics stores).
Once you have the appropriate cables, simply connect the positive (red) terminal on the cable to the positive terminal on the speaker, and then connect the negative (black) terminal on the cable to the negative terminal on the speaker. Repeat this process for each speaker until they are all connected.
Now that your new speakers are connected to your old receiver, there are a few things to keep in mind. First, if your receiver does not have an amplifier built-in, you will need to purchase one separately. Second, because receivers typically have lower wattage than amplifiers or modern stereo systems, it’s important not to overload them by connecting too many speakers or using speakers that require too much power.
Third, if you’re using wireless speakers, make sure they are compatible with your receiver before making any connections.
We hope this blog post has been helpful in showing you how to connect new speakers to an old receiver!
How to Connect Extra Speakers to Stereo
If you’re looking to add some extra speakers to your stereo system, there are a few different ways you can go about it. Depending on the type and model of your stereo receiver, you may be able to simply plug in additional speakers using speaker wire. Alternatively, you might need to use an amplifier or powered mixer to boost the signal before sending it to your extra speakers.
If you’re not sure how to connect extra speakers to your stereo, start by consulting your owner’s manual. It should have detailed instructions on what types of connections are available and how to properly hook everything up. Once you’ve got a plan in place, gather all of the necessary supplies and follow the instructions step-by-step.
With a little bit of patience and attention to detail, you’ll be enjoying music through your new setup in no time!
How to Connect Speakers to Pioneer Receiver
If you’re looking to add some great sound to your home theater setup, you’ll need to connect your speakers to a Pioneer receiver. Luckily, this process is relatively simple and only takes a few minutes. Here’s what you need to do:
1. Start by disconnecting the power cord from your receiver. This is an important safety step that will prevent any accidental electrocution.
2. Once the power is disconnected, locate the speaker output ports on the back of the receiver.
These are usually color-coded, so it should be easy to identify which one is which.
3. Take note of which input port corresponds to each speaker; this will make it easier when you go to connect the wires. For example, if your left front speaker is connected to “Input 1,” then you’ll want to make sure that the wire for your left front speaker is also connected to “Output 1” on the back of the receiver.
4. Now it’s time to connect the wires. Using banana plugs or spade terminals, screw or clip each wire onto its respective output port on the back of the receiver until it’s snug and secure. Be careful not over-tighten these connections, as you could strip the threads or damage the wire insulation.
If using bare wire (no connector), twist each end around its corresponding output terminal until tight; again, be careful not to over-tighten these connections as well.
5. Once all of your speakers are wired up, re-connect the power cord to your receiver and turn it on using either the remote control or front panel buttons/knobs..
You should now be ableto hear sound coming through all of your speakers!
Credit: www.youtube.com
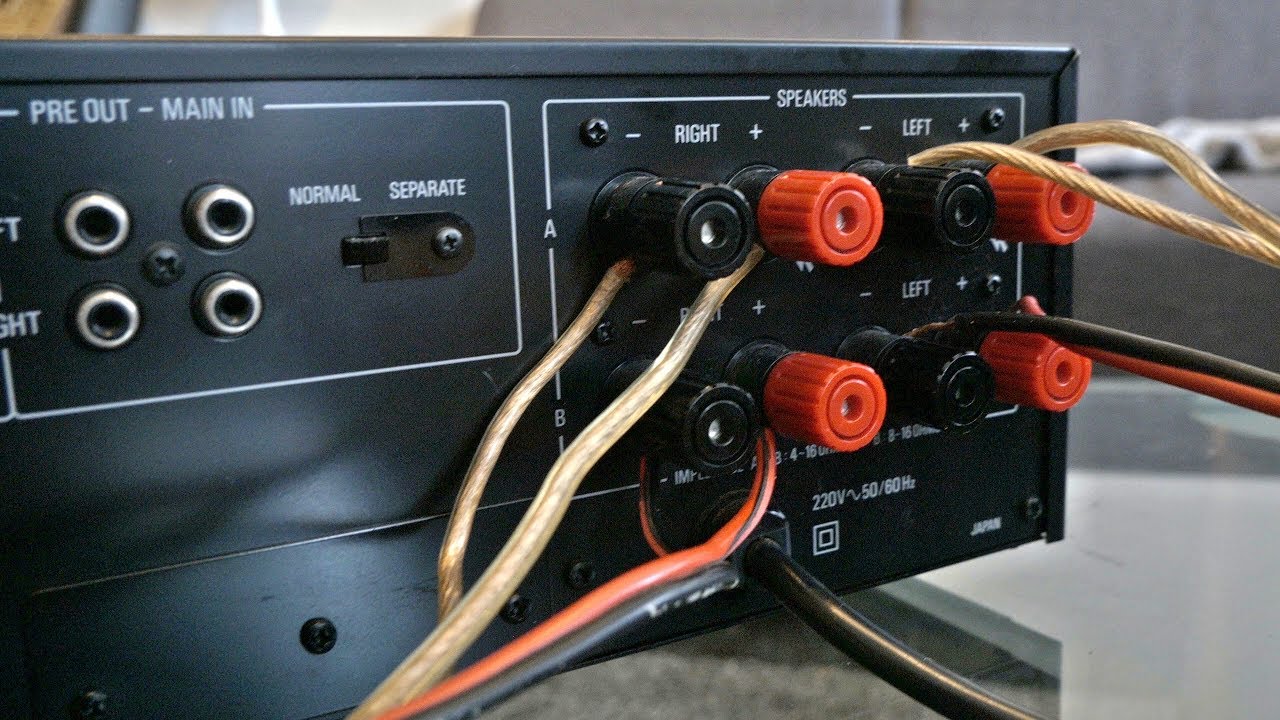
How Do You Connect Speaker Wire to the Back of a Receiver?
If you’re looking to add some better sound quality to your home theater or stereo system, one way to do it is by connecting external speakers. And while it might seem like a daunting task, connecting speaker wire to the back of a receiver is actually pretty straightforward. Here’s a step-by-step guide on how to do it:
1. First, take a look at the back of your receiver and locate the binding posts for the left and right channels. These are usually color coded (red and black) to make things easier.
2. Once you’ve found the binding posts, unscrew them so that you can insert the bare wire from your speaker cable.
If there are any washers or nuts involved, make sure to put them back on once the wire is inserted.
3. Now take the other end of your speaker cable and connect it to the terminals on your speakers (again, these will usually be color coded). Make sure that the + (positive) terminal on your speaker matches up with the + (positive) terminal on your receiver.
The same goes for the – (negative) terminals.
4 .Now all you have to do is screw everything back into place and power on your receiver.
You should now be able to enjoy improved sound quality from your system!
How Do I Connect Speaker Wire to My Denon Receiver?
Assuming you would like a step-by-step guide on how to connect speaker wire to a Denon receiver:
1. Locate the binding posts on the back of the Denon receiver. They are likely color coded, with red corresponding to right channel positive and black corresponding to left channel positive.
2. Loosen each binding post by turning it counterclockwise until it is loose enough to insert the stripped end of your speaker wire into the hole in the center of the post. Do not insert bare wire into the holes on either side of the center hole, as this could cause a short circuit.
3. Insert the stripped end of your speaker wire into the binding post, then tighten clockwise until snug.
Repeat this process for each binding post, making sure that you use matching colors for left and right channels.
4. Once all wires are connected, power on your Denon receiver and test your speakers to make sure they are working properly.
Can You Add Speakers to a Receiver?
Adding speakers to a receiver is a great way to improve the sound quality of your home theater system. There are a few things to consider when adding speakers to a receiver, such as the type of speaker, the size of the room, and the placement of the speakers.
The first thing you need to do is decide what type of speaker you want to add.
There are two main types of speakers: passive and active. Passive speakers rely on the receiver to power them, while active speakers have their own built-in amplifier. Active speakers are typically more expensive, but they offer better sound quality.
Once you’ve decided on the type of speaker, you need to determine how many you need and where to place them. The number of speakers you need will depend on the size of your room and how many channels your receiver supports. For example, if you have a small room and a 5.1 channel receiver, you’ll only need five speakers (three front channels, two surround channels).
But if you have a large room and an 11.2 channel receiver, then you’ll need eleven speakers (five front channels, four surround channels, two subwoofers).
When placing your speakers, it’s important to create an “audio sweet spot.” This is where all the sounds from all the different channels come together in perfect harmony.
The best way to create an audio sweet spot is by using speaker stands or mounting brackets that allow you to adjust the height and angle of each speaker. This gives you more control over how sound waves interact with each other in your room, resulting in better sound quality overall.
How Do You Connect Speakers to an Amp?
Assuming you would like a blog post discussing how to connect speakers to an amplifier:
There are a few things you’ll need in order to connect your speakers to your amplifier – speaker wire and, depending on the type of amp and speaker, either banana plugs or bare wire connections.
First, you’ll need to determine the gauge of the speaker wire.
This is important because using too thin of a gauge wire will result in an impedance mismatch and could damage your equipment. A good rule of thumb is that 16 gauge speaker wire is suitable for lengths up to 30 feet, 14 gauge for up to 50 feet, and 12 gauge for anything longer than 50 feet.
Once you have the correct gauge wire, strip about 1/2 inch of insulation off of each end of the wire using a wire stripper.
If your amp has binding posts, twist each exposed end of the wire around the corresponding post (positive to positive, negative to negative). If your amp uses spring clips, insert each exposed end of the wire into the clip until it clicks into place (again, positive to positive and negative to negative).
Now it’s time to connect your speakers.
For this step, you’ll need either banana plugs or bare wires (depending on what type of input your speakers have). If using banana plugs, insert each plug into the corresponding jack on your speaker until it clicks into place. If using bare wires, twist each exposed end around the corresponding terminal on your speaker (positive to positive and negative left Channel surround sound systems require more care when connecting since there are multiple channels involved – typically five or seven.
To properly connect a 5 channel system:
-Connect one pair of Left and Right Front Speakers directly to Speaker Outputs 1 & 2 on Receiver/Amplifier
-Connect one Center Speaker directlyto Speaker Output 3 on Receiver/Amplifier
Conclusion
If you want to improve your home theater experience, then it’s time to upgrade your audio system. One way to do this is by hooking up speakers to a receiver. This guide will show you how to do it so that you can enjoy movies and music at their best.
First, you’ll need to choose the right receiver for your needs. There are many different types on the market, so take some time to research which one would be best for you. Once you’ve made your decision, it’s time to connect the receiver to your TV or other audio source.
Next, connect the speakers to the receiver. Make sure that they’re properly positioned so that they can deliver optimal sound quality. Finally, test everything out by playing some music or watching a movie.
With a little bit of effort, you can greatly improve your home theater experience by hooking up speakers to a receiver.